Warning
This guide is for Paprika 4, which is currently in beta. Switch to the Paprika 3 guide.
Pantry
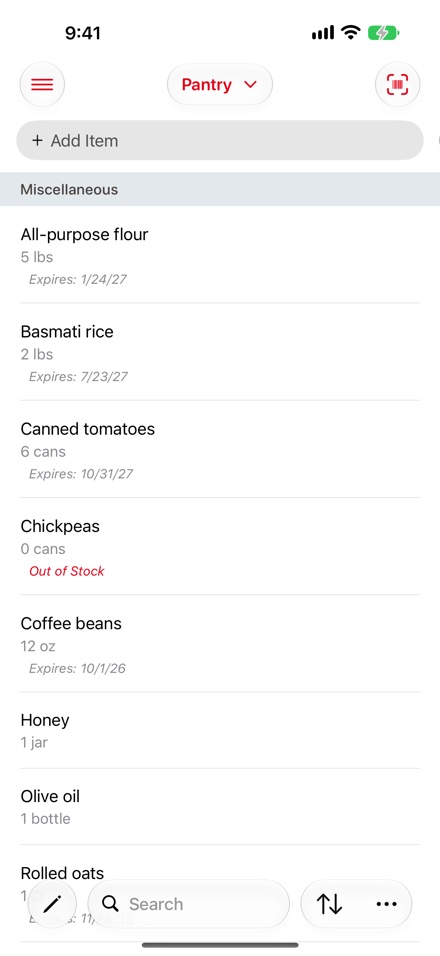
- Add Item Adding Items to the Pantry
- An item, out of stock Editing Pantry Items
- Location picker Pantry Locations
- Barcode button Scanning Barcodes
- Sort button Sorting the Pantry
- Search bar Searching the Pantry
- Actions menu Pantry Actions
The pantry can be accessed by tapping the section in the main menu.
Use the pantry to keep track of common ingredients you already have at home, such as: salt, pepper, flour, sugar, etc.
For each pantry item you can record the quantity, purchase date, expiration date, a note, and whether it is in stock or out of stock.
Ingredients placed in your pantry will automatically be unchecked when you add recipes or meal plans to your grocery list.
Adding Items to the Pantry
To add an item to the pantry, type the ingredient name into the Add Item field at the top of the pantry.
Shortcut You can also add items by scanning their barcodes — see Scanning Barcodes below.
Editing Pantry Items
Tap on a pantry item to open the Edit Pantry Item screen for that item. From here you'll be able to update the item's ingredient, aisle, location, quantity, purchase date, expiration date, and notes.
Note
The In Stock switch and the quantity stepper work together: stepping the quantity down to zero marks the item out of stock, and stepping it up from zero marks it in stock again. Turning off In Stock leaves the quantity as it is.
Pantry Locations Premium
You can organize your pantry into multiple locations, such as Pantry, Fridge, Freezer, or Spice Rack.
On iPhone, the name of the current location is displayed at the top of the pantry screen — tap it to switch to a different location. On iPad, your locations are displayed in the Locations column on the left; tap on a location to view the items stored there.
To create a new location, press the button at the top of the locations list and enter a name. The default location cannot be deleted, but it can be renamed.
To move items to a different location, tap the edit button in the toolbar, select the items, then press the button and choose Move to Location. You can also choose Copy to Location if you would like the items listed in more than one location.
Note
Pantry locations are synced across your devices.
Scanning Barcodes Premium
On iPhone and iPad, you can add pantry items by scanning their barcodes with your camera. Tap the barcode button in the pantry toolbar to open the Scan Barcode screen, then point the camera at a product's barcode.
When a barcode is recognized, Paprika looks up the product and starts a new pantry item with the product's name filled in for you — with the aisle detected automatically, the purchase date set to today, and the location set to the pantry location you are currently viewing. Review the details in the Edit Pantry Item screen and save.
Note
Barcode scanning requires camera access and a device that supports barcode scanning. It is currently available on iOS and Android, but not on Mac or Windows.
Sorting the Pantry
By default, your pantry will be sorted into aisles, similar to the grocery list.
If you prefer, you can change the pantry sort order by tapping the button in the toolbar. You can choose between sorting by: Aisle, Date Added, Expiration Date, or In Stock.
Searching the Pantry
Use the search bar on the pantry screen to quickly find an item. The search matches item names and notes.
Pantry Actions
You can access these actions by pressing the button in the toolbar.
| Action | Description |
|---|---|
| Move to Grocery List | Moves items from the pantry to the grocery list. You can choose between moving all items, expired items, or out of stock items. While selecting items, it moves the selected items. |
| Copy to Grocery List | Copies items to the grocery list, leaving them in the pantry. It offers the same choices as Move to Grocery List. |
Send an email containing the contents of the pantry, formatted as a table with Quantity, Ingredient, Notes, Out of Stock, and Expires columns. |
|
| Print out the pantry as a table with the same columns as the email. |
Table of Contents
- Introduction
- What's New
- Beta Testing
- Overview
- Adding Recipes
- Scanning Recipes
- Browsing Recipes
- Editing Recipes
- Viewing Recipes
- Nutrition
- Categories
- Cookbooks
- Browser
- Groceries
- Pantry
- Meals
- Menus
- Sharing
- Settings
- Extensions
- Resources