Warning
This guide is for Paprika 4, which is currently in beta. Switch to the Paprika 3 guide.
Viewing Recipes
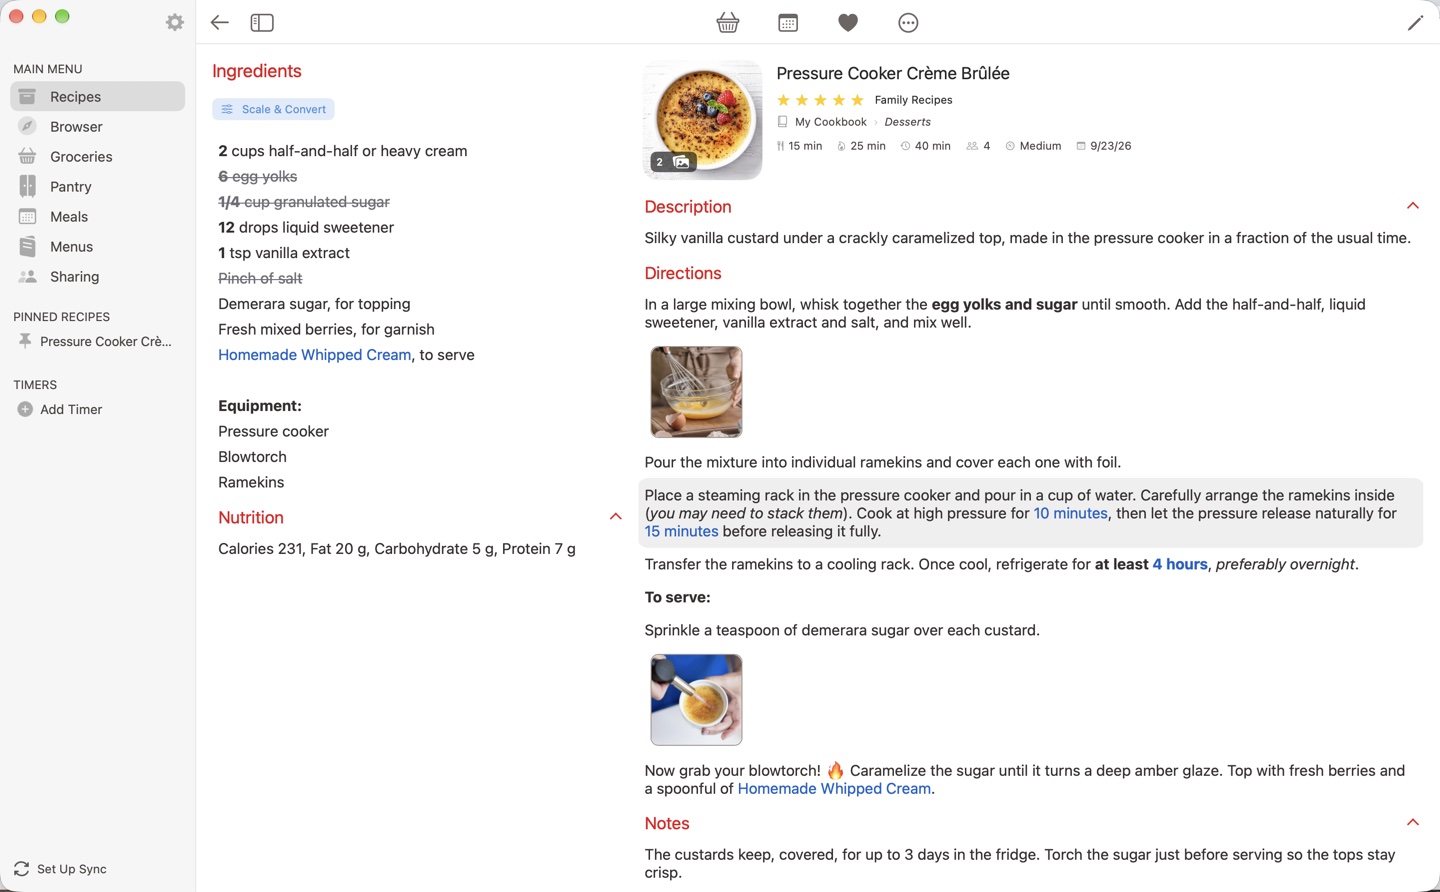
- Recipe toolbar Recipe Actions
- button Editing a Recipe
- Photo Photo Gallery
- Scale Scaling & Converting Ingredients
- Crossed-off ingredient Crossing off Ingredients
- Timer link in a direction Timers
- Pinned recipes Pinning Recipes
- Sidebar toggle Recipes Sidebar
From the recipes screen, click on a single recipe in the listing in order to open the recipe. If in the cell or photo view, you will need to double click. You can also right-click on the recipe and choose .
This is the main recipe view. The ingredients are displayed on the left, information about the recipe is displayed near the top, and the directions are displayed to the right. The description will be displayed above the directions and the notes will be displayed below the directions. Any nutritional information, including a Nutrition Facts label, will appear below the ingredients. The recipe's cookbook is displayed in the header along with its categories.
Note
The description, notes, and nutritional information sections are collapsible. Click a section's header to show or hide its contents.
Note
If the recipe has a source URL, the source will be highlighted in bold. You can click on the source to load the original source URL in the browser. If you prefer recipe links to open in your default web browser instead of Paprika's built-in browser, you can change this in the Settings panel.
Recipe Actions
The top toolbar contains several actions you can perform with the recipe:
| Action | Description |
|---|---|
| Add to Meal Planner | You can add a recipe to the meal planner using this button. Select the date and type of meal you would like to add this recipe to, and then press . |
| Add to Grocery List | Add this recipe to the grocery list. You'll be asked to choose ingredients and grocery list first. |
| Add to Favorites | Add this recipe to your favorites. Click the heart again to remove it from your favorites. |
Less common actions are placed under the button to the right of the other buttons.
| Action | Description |
|---|---|
| Open Recipe in New Window | Allows you to open the recipe in a new window. This is useful if you want to copy and paste more info into a recipe while using the browser, or view several recipes at once. |
| Print the contents of this recipe. | |
| Send to Paprika User… | Send this recipe to another Paprika user as an in-app message. See Sending Recipes & Cookbooks for details. |
Email recipients can import the recipe into their copy of Paprika by clicking the .paprikarecipes attachment. You can email to multiple recipients by separating the email addresses with commas. When emailing a single recipe, the recipe will also be displayed as text/HTML in the body of the email. |
|
| Duplicate | Makes a copy of the recipe and then enters edit mode. Good when trying out recipe variations. |
| Pin Recipe | Pins the recipe to the sidebar. Recipe pins will be synced across devices. |
| Ingredient Substitutions | Suggests substitutes for ingredients you don't have. Needs Apple Intelligence. See Ingredient Substitutions. |
| Share | A submenu with Source Link (when the recipe has a source URL), Paprika File and Recipe Text. Each lists the ways your Mac can share it, such as AirDrop, Messages or Mail. A Paprika file can be imported into another copy of Paprika. |
| Export… | Exports the recipe to HTML or to the paprikarecipes format. |
| Delete | Moves the recipe to the Trash category. |
Printing Recipes
As described above, printing is accessed via the button in the recipe toolbar. Paprika 4 offers an expanded set of options you can configure for printing:
The options are grouped under Print Options, Card Options, Recipe Options, and Photo Options. Options that don't apply to your choices are turned off. When you're ready, click to open the print dialog.
| Option | Description |
|---|---|
| Page Type | Allows you to change the type of page the recipe prints on. Options available are: Full Page, Index Cards, and Index Card Sheets. Index Cards will print to physical index cards, while Index Card Sheets is meant for printing several index cards on full page paper and then cutting them out. |
| Paper Size | Choose the paper size to print on: US Letter, US Legal, A4, A5, or A6. |
| Orientation | Portrait (taller than wide) or Landscape (wider than tall). |
| Font Size | Allows you to change the font size of the printed recipe. |
| Page Margins | Allows you to adjust the printer margins. Measurements are given in inches. |
| Card Size | Allows you to change the size of the index card. Options are given in inches. |
| Card Margins | Allows you to adjust the inner margin of the index card. Measurements are given in inches. |
| Divider | When printing several recipes, choose Page Break to start each recipe on a new page, or Line to separate them with a line. |
| Layout | One Column prints everything in a single vertical column. Two Columns prints the ingredients and directions side by side, and Two Columns (Wrap) lets the directions wrap under the ingredients once they end. |
| Show Info | Whether or not the recipe metadata, such as prep and cook times, should be printed. |
| Show Notes | Whether or not the recipe notes should be printed. |
| Show Nutrition | Whether or not the recipe's Nutrition Facts label and nutrition notes should be printed. |
| Show Photos | Thumbnail Only prints the recipe photo, All Photos also prints the photos embedded in the recipe text, and None prints no photos. Useful if you want to save ink. |
| Thumbnail Size | How large the recipe photo prints: Small, Medium, or Large. |
| Thumbnail Position | Whether the recipe photo prints on the Left or the Right. |
| Photo Size | With All Photos, how large the embedded photos print, from Small to Full. |
You can also print several recipes at once: select multiple recipes in the recipes list, then right-click and choose .
Note
Printed recipes follow your measurement system, and if you have scaled a recipe, the printout will show the scaled servings.
Timers
Timers are automatically detected in your recipe's directions and highlighted in blue. In order to start a timer, simply click on the highlighted time and press . The timer countdown will appear in the left sidebar.
Viewing timers - All of your active timers are displayed in the left sidebar.
Adding a timer manually - From the left sidebar, click the button. You can choose a name for the timer. Once you have selected a time, press to begin the timer.
Removing timers - Timers are automatically removed once they have elapsed. If you would like to manually remove a timer: you can either right-click on it and choose Delete, or click on the timer itself and press .
Editing timers - To change the name or time of a timer, click on the timer in the timers list and press . You can also pause, resume and cancel the timer from this popup, and see the remaining duration of the timer.
Note
Timers can be set for up to 99 hours.
Scaling & Converting Ingredients
Scaling - You can scale the ingredients of a recipe by clicking on the button next to the Ingredients heading.
When the ingredients scaling popover appears, select the amount you'd like to scale the ingredients by and they will change automatically. The scale button will update to display the current recipe scale.
The amount to scale can be entered as a whole number, decimal, or fraction (ex: 3, 0.25, 1/3).
If you add a scaled recipe to the grocery list, the grocery list items will preserve the ingredients scaling.
Note
Paprika anticipates this ingredient format: quantity unit ingredient, i.e. 1 cup milk. For best results, ensure your ingredients are entered in this format.
Converting - You can convert ingredients units from standard (US) units to metric or reset them to their original units by using the Units picker in the same popover.
Crossing off Ingredients
When you are cooking, you may find it useful to cross off ingredients once you have used them. Simply click the desired ingredient in order to cross it off. (Click again to un-cross it.)
Marking Directions
You can also highlight the current step of your directions by clicking on it to help keep your place.
Ingredient Substitutions
Missing an ingredient? Click the button in the recipe toolbar, or right-click a single recipe in the recipes list, and choose Ingredient Substitutions. A window lists the recipe's ingredients. Click one you don't have, and Paprika suggests one or two substitutes, each with an adjusted amount where one is needed and a short reason it works in this recipe. Click the ingredient again to clear it.
Note
Ingredient Substitutions is free. It uses Apple Intelligence, so it needs macOS 26 or later with Apple Intelligence turned on in System Settings; otherwise the action doesn't appear.
Pinning Recipes
You can pin active recipes to easily switch between them while you are cooking. To pin a recipe, click the button in the recipe toolbar, and choose .
Your pinned recipes will be displayed in the left sidebar. Click on any of these recipes to switch to them. When a recipe is pinned, Paprika will keep track of the ingredients you have crossed off and the current directions you have highlighted, so you don't lose your place.
When you're done cooking, hover over the pinned recipe in the list and click the to un-pin the recipe.
Note
From the main recipes list, you can also pin recipes by dragging and dropping them into the left sidebar.
Recipes Sidebar
Click the rectangular button next to the back button in the upper toolbar to show or hide a condensed list of recipes and easily search and switch between them.
Photo Gallery
If there are photos associated with the recipe, you can click the thumbnail to display the photo gallery. The photo gallery contains an ordered list of photos with names displayed at the top.
You can scroll the photos by pressing the left and right arrow buttons which appear when you hover over the image, or using the arrow keys on your keyboard, or swiping with two fingers on your trackpad.
You can close the photo gallery by pressing the key on your keyboard or clicking the button in the upper left hand corner of the toolbar.
To share the photo you're looking at, click the share button (a square with an arrow) in the upper right corner of the gallery, and choose one of the ways your Mac can share it, such as AirDrop, Messages or Mail. The button appears once the photo has been downloaded.
Note
When downloading recipes via the browser, only a link to the online photo is saved unless you explicitly add photos to the recipe using the context menu or by dragging photos into the edit photos screen. In the case that the thumbnail references a linked photo, clicking the thumbnail will load the photo from the internet and display it.
Tip If both a photo link and recipe photos exist, the photo gallery will load and the link button in the upper right corner of the gallery can be used to load the linked source image from the website.
Gestures & Keyboard Shortcuts
| Navigate Back | Press ESC. Also exits the photo gallery. |
| Edit Recipe | Press Command-E. |
| Save Recipe | Press Command-S from the edit screen. |
Table of Contents
- Introduction
- What's New
- Beta Testing
- Overview
- Adding Recipes
- Scanning Recipes
- Browsing Recipes
- Editing Recipes
- Viewing Recipes
- Nutrition
- Categories
- Cookbooks
- Browser
- Groceries
- Pantry
- Meals
- Menus
- Sharing
- Settings
- Extensions
- Resources